Thursday, October 25, 2012
bloglovin'
<a href="http://www.bloglovin.com/blog/4143693/?claim=uf4hgp3z7k7">Follow my blog with Bloglovin</a>
Wednesday, September 5, 2012
Kim Kardashian Makeup
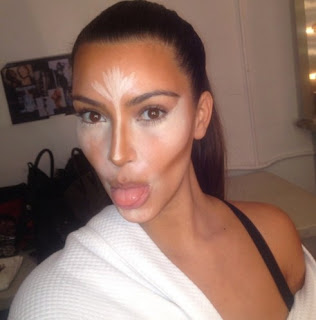
 Everyone knows Kim Kardashian for her infamous contour/highlight. But, this look is not only achievable by professional makeup artists, or those with the tan skin of Kim/JLO. Since Kim has a tan skin tone, she is able to use dark contour creams and lighter products around her eyes. But, on fair skin, it is difficult to find a product that is even lighter than the fair shade you already use. So in order to try and create this highlighted/contoured look with a brown smokey eye, I called upon my best friend Alix who is the "fairest" of them all. **note: you can do this same look on any skin tone** I used Make Up Forever HD Foundation in a shade a little bit darker than her natural skin tone and blended it with a beautyblender sponge. For concealing and highlighting, I first applied a product only a shade lighter than her skin tone to the center of her forehead, her chin, under her cheekbones, and in a triangle shape under her eyes. Then to highlight that area even more, I blended in an even lighter concelaer in a triangle shape under her eyes. Next, I used a cream bronzer and blended it in to her cheekbones, hair line, and jawline with the sponge in order to bronze up the skin in a natural finish. Then , I dusted a matte bronzer over where I applied the cream, and contoured the cheekbones and sides of her nose with a matte blush a few shades darker than her skin tone. For eyes, I did a brown smokey eye, and lined the upper lash line with a black gel liner and added a bit of a wing. To complete the eye, I applied the same gel liner to her waterline, put a few coats of mascara to her upper and lower lashes,and added some false lashes. Finally, I used an angle brush and eyeshadow to define her eyebrows, and applied a translucent powder to the center of her face to seal the makeup with a puff. Finally, I added a nude lip to complete the look, but a red lip would've totally glammed it up!   |
| Before & After |
 |
| CHEEKS Blush: Bobbi Brown Washed Rose Brush: Real Techniques by Samantha Chapman Multitask Brush |
 |
| LASHES Tools: Betsey Johnson for Tweezerman Lash Glue: DUO Dark Tone Lashes: Ardell Wispies Mascara: L'oreal Voluminous Carbon Black |
 |
| LIPS Lip Liner: MAKE UP FOREVER Aqua Lip 3C Lipstick: MAC Creme Cup Gloss: MAC Boy Bait |
 |
| BROWS Brush: MAC 266 Shadows: I used a blend of MAC Charcoal Brown & Omega Clear Gel: Maybelline |
 |
| Completed Eye Makeup |
 |
| hahahaha I had to! (: |
Labels:
Ardell,
beautyblender,
Bobbi Brown,
Brown Smokey Eye,
chanel,
contour,
Dior,
fair skin,
False Lashes,
kim kardashian,
L'oreal,
mac,
Make Up Forever,
makeup,
Nude Lip,
Real Techniques,
urban decay,
Wispies
Tuesday, September 4, 2012
Marriage & Makeup
A few months ago I had the pleasure of working with a beautiful married couple when they wanted some new pictures for their new apartment. I did the hair, makeup, and photography for the pictures. I had so much fun this day, and I wish this lovely couple nothing but the very best in all their years together <3
How to get this look:
Skin:
I moisturized the skin with Embryolisse Laite Creme Concentrate, and then applied Make Up Forever HD Foundation. I then concealed any blemishes and under eye darkness with MAC Studio Finish concealer.
Eyes:
Eye Shadow: I first primed the eyes with MAC Barestudy paint pot. Then, I applied MAC Naked Lunch eyeshadow to the whole lid, and MAC All That Glitters to the "outer V." I blended MAC Satin Taupe through the crease, and then applied the smallest amount of MAC Black Tied to the "outer V" to darken the look.
Liner: I used Bobbi Brown Gel Line in black to line her lash line, and also for her water line. I then used a bit of black shadow to blend the liner along the lower lashes.
Lashes: I first curled Christy's lashes with my Shu Uemura curler, and applied a coat of L'oreal Voluminous Carbon Black Mascara. I then applied a set of Ardell "Wispies" Lashes, and coated her bottom lashes with Clinique Bottom Lash Mascara.
Brows: I mixed together MAC Charcoal Brown & Omega for the perfect color and applied it to her eyebrows with an angled brush. I finished them off with a bit of clear mascara to set them in place.
Face:
I first powdered Christy's T-Zone with Laura Mercier Transluscent Powder and applied a bit of NARS Bronzer in Laguna to her cheekbones, hair line, and jaw line. I then did a bit of contouring to her cheekbones with MAC Blush in Harmony, and applied NARS Blush in Deepthroat to her cheeks.
Lips:
I lined and filled in her lips with MAC Brick lip liner, and applied Chanel Rouge Allure in the color Passion. I finished off the look with a bit of clear gloss applied to the center of the lip.
Hair:
I curled Christy's hair using my Enzo Milano clip less curling iron.
Labels:
Ardell,
chanel,
lashes,
love,
mac,
makeup,
makeupforever,
nars,
photography,
red lipstick
Sunday, September 2, 2012
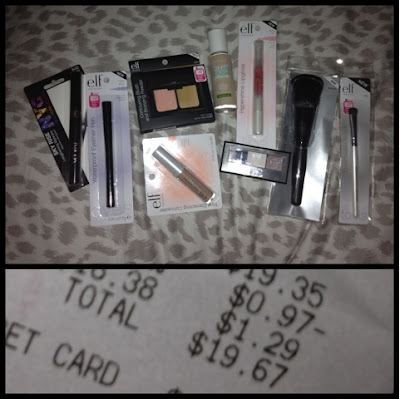
Complete Makeup for under $20
Hello! So, I decided to take on the challenge of completing a whole makeup look in under 20 dollars. Let me tell you, $20 goes by really fast especially when you need to include brushes. In order to stay within budget, I did my shopping at target because they carry the very inexpensive brand, e.l.f (eyes,lips&face). This brand sells most of their products in the 1 and 3 dollar range, which was ideal for this challenge. But for foundation, mascara, and eyeshadow, I found that brands such as Rimmel and NYC had a better selection...which were still in the under $4 range.
Products Used:
Rimmel Clean Finish Foundation $3.99
e.l.f Tone Correcting Concealer $1
e.l.f Blush and Bronzer- $3
e.l.f Hypershine Gloss- Flirt $1
NYC Sky Rise Mascara- $1.77
NYC Eyeshadow Palette- $3.59
e.l.f Waterproof Eyeliner Pen- $1
e.l.f Complexion Brush $3
e.l.f Eyeshadow Brush $1

special thanks to my model Janel! <33
Wednesday, August 15, 2012
Thursday, July 26, 2012
My Signature Look
Hello!
Okay, first of all I am so so very sorry for the delay on this blog but here it is!
My current foundation routine is as follows:
1. Apply a lighter foundation or concealer in a V-shape from your tear duct down to your cheek bone and up to your brow bone. I used Clinique Line Smoothing concealer in the shade light.
2. Dot your regular foundation on the other areas of your face. I used Chanel Vitalumiere Aqua in shade 20 Beige.
3. Using a Beautyblender sponge, bounce and roll the sponge along your face to ensure all the product is blended in to look flawless.
4. Using a powder puff, apply a translucent powder to your t-zone and under eye area. I used Laura Mercier Translucent Powder.
I already have naturally thick brows, so I just use the Revlon Brown Fantasy to fill in any gaps and smooth the hairs into place. Remember to always choose a shade lighter than you would think for a natural finish.
I love using MAC Painterly Paint Pot to even out the skin tone of my eye lid. This product also works great as a primer/base for your shadows.
Take a light frosted color and apply it to the lid using a flat shader brush. Then take a light brown color on a fluffy brush to define your crease. Then take some of the light color under your brow.
I used MAC Nylon, Soft Brown, and Wedge shadows.
Then using a pencil brush, apply a darker brown to the lower lash line. I used MAC Charcoal Brown.
Take your favorite eyeliner and draw a line from the outer corner of your lower lash line and bring it in to the upper lash line. This should create a triangle like the one shown above. Then, fill in the triangle, and continue to line the eye in small strokes from the triangle to the inner corner.
Apply a few generous coats of your favorite Mascara to your upper and lower lash line. Then apply a nude eyeliner to your water line. This step will create the illusion of larger eyes. Apply another coat of concealer, or an eye brightening pen to the under eye area and blend in with your ring finger.
I used NARS nude eye kohl, Maybelline Mega Plush Mascara, and By Terry Touche Veloutee.
If you are like me and were not blessed with tan skin and amazing cheekbones then do not forget the Bronzer! I like to apply my bronzer with a duo-fiber brush to the back of my cheekbones rather than using a dense brush to really contour and chisel them. The duo fiber brush ensures that you do not put too much product on at once, so you don't end up going from zero to Snooki in one stroke. Lately I have been loving this NYX Matte Bronzer in the shade light.
Apply blush to the front of the cheekbone where your bronzer end rather than the apples of your cheeks for a more natural look. I tend to lean towards nude rose shades when I wear a bright lip... the perfect shade for this is Bashful by Youngblood Cosmetics. Once again, I use a duo-fiber brush to ensure that I do not apply too much product.
Get your lips ready for lipstick with MAC Prep+Prime. According to MAC, this product serves as a layer of moisture for your lips and stickiness for the product to cling to. Then line and fill in your lips with a lip liner that is similar to the shade you are planning to wear.
I used MAC Brick Lip Pencil.
After applying one coat of lipstick, dust a little bit of transclucent powder over your lips and go in for a second coat. According to my research, this help the lipstick dry on your lips to decrease the chance of the color melting and smearing away.
My all time favorite red lipstick in NARS Velvet Matte Lip Pencil in the shade Cruella. This lipstick feels like silk on the lips and gives a flawless matte finish. The fact that it is shaped like a pencil makes for easy application. Also, if you are looking for a less blue-toned red, NARS makes another shade in this line called "Dragon Girl" which is the color you will always catch Taylor Swift wearing!
special thanks to my bestie Janel Aguirre for helping me take these pictures!
Monday, July 2, 2012
Prom Season 2012
 |
| Nicole-8th Grade Prom |
 |
| Kailey- Senior Prom |
 |
| Ashley- 8th Grade Prom |
 |
| Janel- Senior Prom |
 |
| Kathya- Senior Prom |
 |
| Ashley- 8th Grade Prom |
Subscribe to:
Comments (Atom)


